Mk-Eng-Kv-Scab-art - 11/9/14
"How
to make a Medieval English Scabbard Using Period Techniques and Tools" by
HL Czina Angielczyka.
NOTE: See
also the files: HTBuy-Leather-art, leather-msg, lea-tooling-msg,
bladesmithing-msg, blades-lnks, knife-sheaths-msg, Scabbard-Mkng-art,
scabbards-msg.
************************************************************************
NOTICE -
This
article was submitted to me by the author for inclusion in this set of files,
called Stefan's Florilegium.
These
files are available on the Internet at: http://www.florilegium.org
Copyright
to the contents of this file remains with the author or translator.
While the
author will likely give permission for this work to be reprinted in SCA type
publications, please check with the author first or check for any permissions
granted at the end of this file.
Thank
you,
Mark S.
Harris...AKA:..Stefan li Rous
stefan at
florilegium.org
************************************************************************
Class
notes from her talk at the Ansteorra King's College event, 2012
How to make a Medieval
English Scabbard
Using Period
Techniques and Tools
by HL Czina
Angielczyka
Introduction
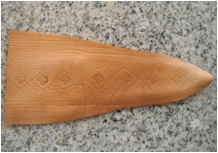
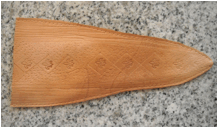
This is a step-by-step
instruction guide to making a leather scabbard (Figure
1) using the
known tools and techniques of the Medieval English leather worker. These
directions assume a basic knowledge of leatherwork, and some of the techniques
may be new to the modern leather worker. These directions draw on historical
examples of tools, techniques, and extant leather pieces, along with modern
leatherworking techniques to create a 'How-To' manual that is consistent with
historical examples.
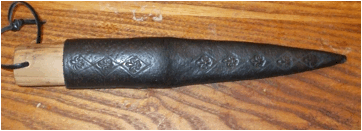
Figure
1: Recreation of
Scabbard 391. (Author)
Materials and Tools Needed
Knife
for modelling (or wooden approximation)
Felt
Sewing
thread and needle
Scissors
or seam ripper
5/6
oz. Vegetable tanned cowhide
Bowl
of water
Straight
edge - wood, metal, etc.
Tracer
Half-moon
knife or a sharp, heavy-duty knife
Knife
safe cutting board or mat
Marble
slab
Wooden
or rawhide mallet
Fleur-de-lis
stamp
Overstitch
wheel - 5 stitches per inch
Iron
oxide mixture - rust water
Sheepwool
scrap
Latex
or rubber gloves
Wing
dividers
Linen
thread
Beeswax
Stitching
awl
2
Harness needles or boar's bristles
Neatsfoot oil
Leather History and Extant Examples
Leather is the skin of
an animal, processed so that it does not rot. Leather can be made from any
animal skin, including cattle/calf, ox, goat, deer, horse, and sheep, to name a
few. Leather has been used since
pre-historic times for a variety of objects - clothing, tents, shields, etc.
Stone scraped skins have been dated to over 100,000 years old and suggest that
some form of preservation was done at that time. 'Modern' man was preserving leather
40,000 years ago by rubbing them with fats (which is similar to the 'brain
tanning' used by Native Americans.) (Salaman 294)
There are different
types of chemical treatments to create leather. The type used for this project
is vegetable tanned leather. Vegetable tanned leather has been in use for at
least 4000 years, and it is possible that the process is even older. (Reed 72)
It was possibly discovered as a result of accidentally immersing skins in pools
with a high tannin content, or by trying to color the leather with vegetable
matter. (Salaman 294) Vegetable tanning involves impregnating the skins with
tannins, which are acidic compounds found in the bark of trees and other
plants. These tannins are leached from the bark to form a 'liquor bath,' and
soak into the hide to chemically change the structure of the skin into a
water-resistant, durable material. The tanning process can take months to
complete, using large volumes of water and bark.
After the tanning
process is complete, the back of the leather is skived (thinned) to different
thicknesses - thicker for saddles, thinner for shoes. Historically, skilled
workers did this with large knives - a process now done by machine. Leather is
measured in 'ounces'. One-ounce (1 oz.) leather is 1/64th of an inch thick. Due
to the nature of leather, this thinning process is not completely uniform, so hides are usually referred to by 2
numbers - 5/6-oz. leather is leather whose thickness varies from 5/64 - 3/32
inch thick.
After skiving, the
leather is curried - smoothed, stretched, and conditioned. This process keeps
the leather flexible and the fiber structure from breaking. Dubbing/dubbin, a
mixture of tallow and oil (neatsfoot, cod-liver, or sperm whale oil, for
example) was often used as the final conditioning agent before sale.
Vegetable tanned
leather is the type commonly used in scabbards, belts, saddles, and shoe soles.
Knives and scabbards (or sheaths) have been essential accessories for people
throughout history. Much like a pocketknife today, knives were versatile tools
and used in many professions. They were also a necessary eating utensil in
Medieval England, at a time when diners were expected to bring their own
flatware to the table. (Cowgill 55-56) Leather scabbards have been used since
prehistoric times to protect knifeblades. (Waterer 1956, Fig. 119)
Museums throughout
Europe have medieval leather items on display. These items range from
ceremonial pieces to everyday items. Due to increased interest in the 20th
century, there are museums dedicated to the study and conservation of leather
items, most notably the Deutsche
Ledermuseum (Germany) and the Northhampton Leather Museum (England).
There
are two types of medieval leather artifacts: intact items, usually found in
museum collections, and the remains of items, found in archeological
contexts. Remains of leather items
are most often found in waterlogged sites like the Thames revetments due to the
anaerobic conditions; bacteria and other elements normally destroy leather
items buried in the ground. The Museum of London has produced a book of knives
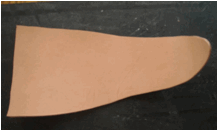
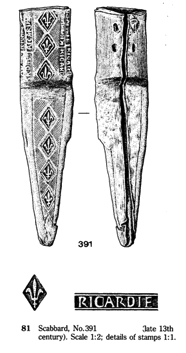
and scabbards found in various London excavations. The scabbard being created (Figure 1) is based upon 'Scabbard 391' recovered from Swan Lane in London
dated to the late 13th century, no later than CE1280. (Cowgill 1)
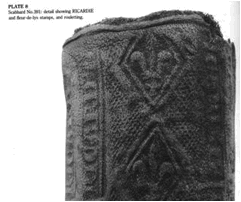
Figure 2: Close-up of Scabbard 391.

Figure
3:
Line drawing of Scabbard 391.
(Cowgill 122)
Steps to Make the Scabbard
Each
knife is slightly different, so the pattern should be made to fit the knife for
which it will be used. The handles of medieval knives were fairly standardized,
so the main variation in scabbards occurred in the blade section. (Cowgill 35) Experienced sheath makers would probably not need a new
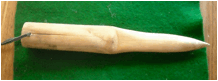
pattern for every knife, but would have a variety of 'standard' patterns. A wooden last (an approximation of a
knife) can be used for a more generic shape. (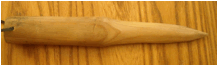
Figure 4).

Figure 4:
Wooden last, used for moulding and forming scabbard. (Author)
Using Felt to Create
the Pattern
There are no extant
'patterns', but wool, thin wood, rawhide, or even leather are all possible
materials that could have been used to create permanent patterns. Scabbards were also reused, as
evidenced by the cuts and re-stitching on recovered examples. (Cowgill 39) Felt
is a material similar to leather - flexible, but with more body and thickness
than regular fabric. It is easy to sew and cut, and the cut edges won't fray or
come apart. These properties make it a good material to use when making
patterns
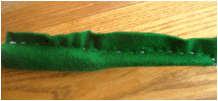
Cut a piece of felt
larger than the wooden last. (
Figure 6)
Figure 6: Cut piece of felt.
(Author)
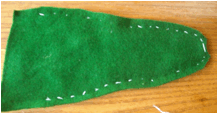
Using sewing thread in
a contrasting color (white in this case), sew the felt around the last with the
seam in the center back. Use large 'running' stitches. Pull the felt taut,
keeping the seam centered. When the seam is complete, trim away the excess
felt. (
Figure 8).
Figure 8: Sewing the felt
around the last. (Author)
Remove the felt from
the last and slice the seam apart, using scissors or a seam ripper. Leave the
cut threads in the felt, creating the outline of the pattern. (Figure 10)
Figure
10:
Felt cut apart, showing the pattern line. (Author)
Using the cut threads
as the pattern line, cut the felt to the correct size. (Figure 12)
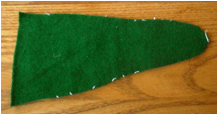
Figure 12:
The felt cut apart, showing the pattern. (Author)
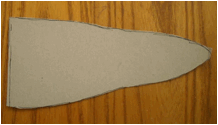
Transfer this pattern
to cardstock to make a permanent pattern. (Figure 14)
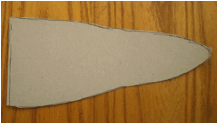
Figure 14:
Cardstock pattern made from the felt. (Author)
See Appendix 1 (pages
23 - 24) for an alternate modern way to create a similar pattern.
Take a piece of
5/6-oz. vegetable tanned cowhide and carefully examine the piece for any cuts
or major marks on the grain side. The scabbards found in London are described
as being made of vegetable-tanned calf leather, approximately 2 mm thick.
(Cowgill 34, 122) This translates to 5 oz. (5/64 in. thick) modern vegetable
tanned cowhide.
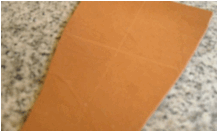
3. Lightly Wet Leather and Trace Pattern
Use a sponge to
lightly wet the leather on the grain side. Use the tracer (Figure 16)
like a pencil to scribe the pattern onto the front (grain side) of the damp
leather. (Figure
17) Tracers were
normally made from (non-ferrous or coated) metal, wood, or bone. (Salaman 138,
198 - 200) Scabbards were made with the grain side out, (Cowgill 34) because
the grain is tougher and more water-resistant, and allows stamping and tooling.
Figure 18 shows the line
traced on the dampened leather.
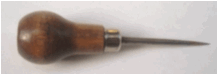
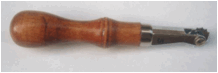
Figure 16: Tracer. (Author)
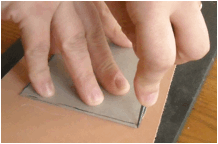
Figure 17: Using the tracer. (Author)
Figure
18:
The cutting line traced on the dampened leather. (Author)
![]()
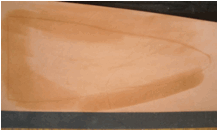
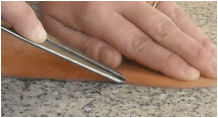
Cut along the pattern line, using the half-moon knife (Figure 19) (or other sharp, heavy-duty leather knife). Make sure your knife is sharp, and
follow knife safety guidelines. Figure 20 shows the leather after being cut. The half-moon knife is
the traditional leather worker's cutting tool. (Salaman 133, 138) This design
of knife has been used since at least the time of the ancient Egyptians. The
design has only changed slightly through the centuries. (
Figure 21)
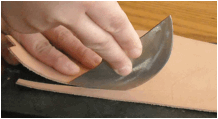
Figure
19:
Using the half-moon knife. (Author)
Figure
20:
The cut out leather. (Author)
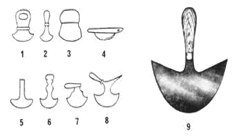
Figure 21: Historical examples of the half-moon knife. (Waterer
1968, pl. 5)
The following are directions for a scabbard in
the style of Scabbard 391 (
Figure
3) in the Museum
of London collection. (Cowgill 122) Figure
23 shows other examples of 'single motif' stamps used on
scabbards. The earliest examples of single-motif stamping in the London
collection are from the Swan Lane deposit (no later than CE1280.) (Cowgill 43 -
44, 122 and Salaman 196) Single dot stamping used to 'outline' designs were in
use a bit earlier (early to mid 13th century). Heraldic motifs were popular in
Medieval England and the rest of Europe – scabbard 391 is an early
representation (Cowgill 42) - see Figure 16 for more designs. At that time,
stamps may have been made from metal or wood, but modern tools are made from
steel or zinc and plated to prevent rust damage on the leather.
The name 'Ricardie'
was stamped on the handle of scabbard #391. This has been omitted, but another
name could easily be substituted if a suitable stamp was made. Scabbard makers
did not mark their work in the extant examples, but there are examples of
post-purchase 'graffiti' made by the owner (Cowgill 40).
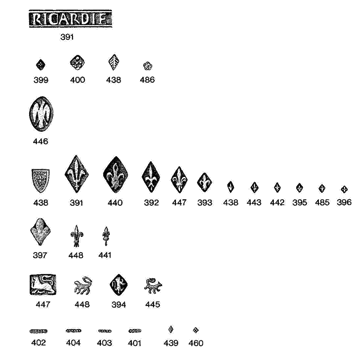
Figure 23:
Stamp impressions from the Museum of London collection. (Cowgill 44)
Directions for decorating the leather:
Thoroughly wet the
leather by submersing the whole piece in a bowl of water or by using a sponge
to wet it in sections. The leather needs to be wet in order to do any
decorations or forming (Cowgill 35, 40, 43, and Salaman 195, 196, 198). Let it
sit until there is no water on the surface, and the color has started to return
to normal. If the leather is too wet, the stamping will be blurry; too dry, and
the impression won't hold. Rewet the leather as needed during stamping.
Do all stamping on a
marble slab or other smooth, sturdy surface - this will help prevent the stamp
from bouncing, creating a double impression. Use a wooden or rawhide mallet, because a metal hammer will
damage the stamp, causing the top to 'mushroom' and deform.
Scribe the
division line between the handle and blade sections onto the leather using the
tracer (Figure 16)
and straight edge, following the extant example,
(Cowgill 40 and Salaman 198 - 200) and then decorated. (Figure 17)
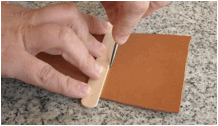
Figure 24: Scribing the
division line. (Author)
Scribe a line down the
center of the scabbard as a guide for stamping. (Figure 25)
Figure
25:
Scribed lines on the scabbard. (Author)
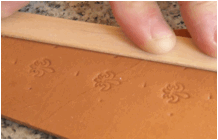
Using the wooden mallet, stamp the line of fleur-de-lis
onto the leather, using the scribed line as a guide. (Figure 26 and Error! Reference source not found.)

Figure
26:
Fleur-de-lis stamp.
(Tandy Leather Factory)
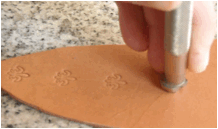
Figure 27: Stamping the line of fleur-de-lis. (Author)
Scribe the diamonds around the fleur-de-lis, using a
straight edge and the tracer. This is called modeling, because they are
pressure lines, not made with a mallet and stamp. (Figure 28 and Error!
Reference source not found.)
Figure
28: Laying
out the diamonds for modeling. (Author)
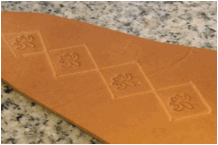
Figure
23: Scribing the diamonds
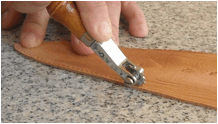
Use the overstitch
wheel (
Figure 30)
to create the background dots on the front of the scabbard. Avoid going over
the edge onto the diamonds or on the back portion. An overstitch wheel is a modern
equivalent to a rouletting wheel,
which was used to create the background dots (Cowgill 43, Pl. 8 and Salaman
260). A roulette is a small toothed
disk of metal attached to a handle and used to make rows of dots or cuts, as on
postage stamps. The rouletting
was probably done first, followed by stamping with the fleur-de-lis stamp,
which covered any mistakes by the rouletting.
Figure 30: The overstitch
wheel. (Author)
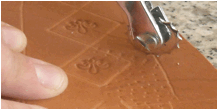
Figure 32: Using the overstitch wheel to decorate the front of the
scabbard. (Author)
Scribe the back of the
scabbard using the tracer to create vertical lines. (Error! Reference source not found.)
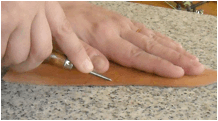
Figure 28: Scribing the vertical lines
Figure 33 shows the
completely decorated scabbard.
Figure
33:
The decorated scabbard. (Author)
To make the leather
dye, combine vinegar and water in approximately equal portions with scraps of
iron (steel wool or old nails, for example) to create iron oxide. It can take
awhile to form enough liquid to dye the leather - start making the dye about 2
weeks early for this project. The liquid is done when it has turned orange/red.
A foamy 'scum' often forms on the top, especially in a sealed jar. Straining
the liquid ensures that no metal filings stick to the leather.
This iron mixture combines with the tannins in
the leather and permanently dyes the leather. This is a chemical reaction, so the amounts of tannins in
the leather can affect the final result.(
Figure 34)
Figure
34: Example of 'rust
water dye' on vegetable tanned leather. (Author)
Black dye on leather
and fabric was commonly used through the Middle Ages. This dye was formed by
the combination of iron compounds (copperas [green vitriol] and/or rusty iron
pieces) and tannins - either galls, in the case of fabric, or the tannins added
to the leather during the tanning process. (Cowgill 40; Rosetti xix; recipes
168, 173, 178,190, 193) "Then
take one ladle of dregs of filings and a half of scale of iron and a flask of
white vinegar and one ounce of Roman vitriol …." (Rosetti, recipe 190)
This same principle is used for the creation of ink in On Divers Arts around
CE1100. The recipe calls for tannin to be mixed with wine and green vitriol,
which creates colorfast and long-lasting ink. If the ink is not black enough,
Theophilis recommends adding more iron to create more of a reaction (Theophilis
42).
This same tannin/iron
reaction has been recorded on Hallstatt era (800-400BCE) textiles (Hofmann-de
Keijzer, et al. 58), which helps indicate the antiquity of the recipe. Modern
leatherworking tools are coated in zinc to prevent such a reaction, and modern
vegetable tanned leather sometimes shows black marks made from the nails of wet
shipping pallets.
Apply the dye with a
scrap of sheepwool or old cloth. The color is not as dark as modern black dye,
and will appear somewhat gray.
Apply a second coat. More
coats can be applied to achieve a darker color. Gloves should be worn while dyeing the leather to avoid
over-exposure to the iron, which can enter any cuts on the hands. Prolonged
exposure to the just dyed leather can cause a bit of black rub-off (the liquid
washes out a bit of the tannins from the leather) but it washes off. Also, be aware that wood, especially
non-finished wood, may have tannin in it, and can be stained black if it
touches the rust water.
Making the 'rust
water' is recommended over using iron powder (Ferrous Sulfate Heptahydrate,
available from nature dye suppliers). Experiments with using the powder to dye
leather did work, making the leather black, but a salty residue formed and kept
reappearing, even after repeated rinsing and overdyeing with rust water.
Further trials with this powder may prove to make it equal to rust water, but
the rust water is easy to make and very inexpensive.
6. Mould the Leather and Mark the Stitch
Line
Re-wet the leather and
mould it around the last, matching up the seams. While wet, the leather is very
flexible, and will stretch around curves. When dry, the leather will retain
that shape.
Carefully line up the
edges of the seam. Use the wing dividers (Figure 35) to mark the
seam line approximately 1/16-inch from the seam. (Figure 36) In extant examples from England, the
stitch line measurement is not given, but a good rule of thumb is to inset the
seam the same distance as the thickness of the leather (5/64 to 1/16-inch)
(Stohlman 1977, 7).
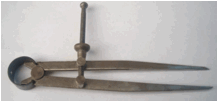
Figure
35:
Wing dividers. (Author)
Figure
36:
Using the wing dividers. (Author)
While the leather is wet, impress stitch marks
using the overstitch wheel (
Figure 30), which marks
5 stitches per inch. Mark each side of the seam so that the holes line up. (Figure 37 and Figure 38) The stitches
on the extant example were approximately 5-7 mm. apart (Cowgill 37), which
translates to 5 stitches per inch and the overstitch wheel is conveniently
spaced for that distance. Experienced sheath makers may have had special tools
to mark and space the stitches.
Figure
37:
Marking the stitches with the overstitch wheel. (Author)
Figure
38:
The stitch holes marked around the edge of the scabbard. (Author)
7. Punch the Holes and Sew the Leather
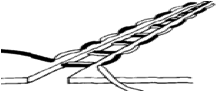
Figure
39: Example of
edge/grain stitch (Grew, et al. 49)
The edge/grain stitch
(Figure 39) is used to stitch the seam. This stitch goes through
the grain side of the leather, but instead of going all the way through
straight up and down, the thread goes through at an angle and exits through the
edge of the seam. This stitch does not allow the blade of the knife to touch
the thread, which protects the stitching from wear and tear. Practice this stitch on scraps to learn
how tight to pull the thread without tearing through the leather.
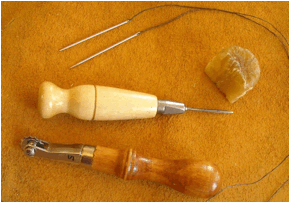
Figure 40:
Stitching Tools: awl, overstitch wheel, beeswax, linen thread,
and
harness needles. (Author)
Figure 40 shows the tools used for sewing leather. Use 2-ply thread (linen, or
its modern equivalent, nylon) to sew up the scabbard. 2-ply linen thread was
probably used on the extant example, although the thread has disintegrated.
(Cowgill 37) Linen thread came in a variety of weights and colors for clothing
(Crowfoot 151), so black linen thread was probably available to the scabbard
maker as well. Either coat the thread with beeswax, or use pre-waxed thread.
The wax helps the stitches 'grip' the leather and keeps the stitches tight.
(Grew et al. 48)
Harness needles are used for the sewing, in conjunction
with a diamond shaped awl. An alternate modern option is to use a curved awl, and/or
flexible or curved needles. There is no evidence these were used on the extant
examples from England, however. Lightly wetting the leather can help with
sewing through the angled holes.
Medieval leather workers traditionally used boars' bristles
(Figure 41) to pull thread (Waterer 1968, 50). The thread was
attached to the end of the bristle with wax, rather than put through a hole, as
with a needle. These bristles, which are flexible enough to go through curved
holes, are not readily available today. Blunt tipped harness needles will
achieve the same result.
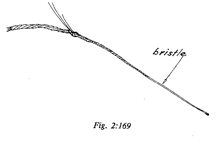
Figure 41: Boar's bristle.
(Salaman 173)
Carefully push the diamond shaped awl so the
hole goes through the grain and the edge.
Be certain that the holes are lining up so that they match on the sides
of the seam. Holes can be punched and stitched in pairs, or all of the holes
can be punched at once. (Figure
42)

Figure
42:
Awl holes around the edge of the scabbard. (Author)
Cut a length of thread about 3 times the length of the seam
to be stitched. If the thread is not pre-waxed, run each strand through the
beeswax to get an even, thorough coating. (Figure 43)
Roll the strands together to form the 2-ply thread.
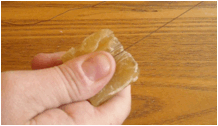
Figure
43:
Waxing the thread. (Author)
Thread
a harness needle on each end of the (waxed) thread. They won't cut the leather,
as they are blunt. Roll the thread
and 'tail' together between the fingers or on a scrap of leather until the
pressure and heat allows the beeswax to fuse them. (Figure 44) The thread
coming out of the needle should not be much thicker than the needle, or it may
catch on the leather and tear it. The thread will go through each hole twice,
as in modern saddle-stitching.
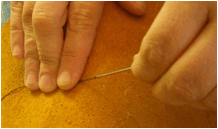
Figure 44:
Rolling the 'tail' of the thread. (Author)
Start stitching at the point (tip) of the scabbard so that
the thread ends at the top for tying off.
(

Figure 45) Pull the
thread halfway through, so there are equal lengths on each side of the seam.
Then carefully start stitching up the scabbard, pulling the thread taut without
tearing the leather.
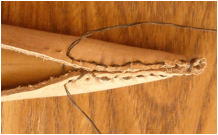
Figure 45:
Stitching up the scabbard. (Author)
At the top of the scabbard, backstitch one time, and then
tie off the thread in a simple square knot and clip the ends close to the
leather. Backstitching another stitch and then pulling the thread to the center
and trimming would also work, but the holes are so shallow the leather could
tear. Figure shows the completed stitching.
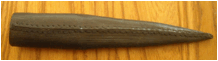
Figure 40: Back of the
scabbard, showing the stitches. (Author)
The top edge of the
scabbard can be trimmed and evened out using a sharp knife after sewing, if
necessary.
Apply a thin coat of
neatsfoot oil to the scabbard. This will darken the color even more. In Medieval Europe, leather was oiled
when it was tanned (Plictho xix and
various recipes), and curried (trimmed and thinned to the appropriate weight.)
(Cowgill 34) Oiling periodically helps prevent the leather from drying out or
rotting. Any number of oils may have been used, but there is no evidence which
type was used on extant examples. Cod oil, olive oil, and eggs were all used
during this time on different types of leather, as well as other oils. (Plictho
xix; Tuck 5; Salaman 108) Neatsfoot oil is obtained by pressing
the hooves of cattle and other animals (Neat
is an Anglo-Saxon term for cow). This is the most common oil lubricant in use
for modern leatherwork.
Cut hanging slits in
the back portion of the handle using the half-moon knife. These slits determine
the angle at which the scabbard hangs from the belt. In Medieval England, the owner would cut hanging slits in
the scabbard after purchase to suit his or her own needs. (Cowgill 54)
Conclusion
Modern leatherworking
tools are not very different from their medieval counterparts, although some
techniques have given way to others. The tools used for leatherwork were
developed relatively early, with little or no change until modern times. By
using authentic tools and techniques, it is possible to experience the level of
craftsmanship and skill of the Medieval leather worker.
Works Consulted
Cowgill,
Jane, Knives and Scabbards (Medieval
Finds from Excavations in London: 1). London: Her Majesty's Stationary
Office, 1987. New addition – Woodbridge: The Boydell Press, 2000.
Excellent
resource for extant examples of knives and scabbards. Well written and easily
understood by laypeople. It includes basic medieval leatherworking information,
as well as scale drawings of the leather stamps used on the scabbards. Part of
the Medieval Finds series. ISBN: 0851158056
Crowfoot,
Elisabeth, Frances Pritchard, and Kay Staniland, Textiles and Clothing c. 1150 - c.1450 (Medieval Finds from Excavations
in London: 4). London: Her Majesty's Stationary Office, 1992. New Addition
- Woodbridge: The Boydell Press, 2001.
Excellent
source for information on medieval textiles. Gives information about what was
found in the Thames revetments, as well as medieval techniques. Part of the
Medieval Finds series. ISBN: 0851158404
Grew,
Francis and Margrethe de Neergaard, Shoes
and Pattens (Medieval Finds from Excavations in London: 2). London: Her
Majesty's Stationary Office, 1988. New addition – Woodbridge: The Boydell
Press, 2001.
Excellent
source of information on medieval shoes. It includes line drawings and
photographs of extant examples of shoes, as well as more medieval
leatherworking and shoemaking information. Part of the Medieval Finds series.
ISBN: 0851158382
Hofmann-de
Keijzer, Regina, et al. "Dyestuff and element analysis on Textiles from
the Salt-mines of Hallstatt" in Hallstatt Textiles: Technical Analysis, Scientific
Investigation and Experiment on Iron Age Textiles. Oxford: Archaeopress, 2005.
Premier resource on Hallstatt textiles. This article
shows the dyestuffs analyzed and used. ISBN: 1841716979
Reed,
R. Ancient Skins, Parchments and
Leathers. London: Seminar Press, 1972.
Very
informative book about the processes used to tan, taw, and otherwise treat
skins for use as writing materials. ISBN: 0129035505
Rosetti,
Gioanventura. The Plictho. (Ed. and
trans. by Sidney M. Edelstein and Hector C. Borghetty). Cambridge,
Massachusetts: MIT Press, 1969.
Sixteenth
century Italian dye manual, which includes a whole section on dyeing leather.
It contains both the original and a full translation with notes. ISBN: 0262180308
Salaman,
R. A. Dictionary of Leather-working
Tools, c. 1700-1950, and the tools of the allied trades. Mendham, New
Jersey: Astragal Press, 1986.
Comprehensive
book of historical leatherworking tools. While the start date is post-period,
the author indicates ancient and more modern tools. Great line-drawings and
information on obscure tools in the various leatherworking trades. ISBN: 1879335727
Stohlman,
Al. The Art of Handsewing Leather.
Ft. Worth, TX: Tandy Leather Co., 1977.
A
good reference for modern leatherworking sewing techniques - although even
these have given way to sewing machines. While there is no pre-modern history
given, the techniques are conjecturally period ways for sewing leather. ISBN: 1892214911
Stohlman,
Al. Leathercraft Tools. Ft. Worth,
TX: Tandy Leather Co., 1984.
Gives
methods for using the tools and good line drawings of the tools. While the
tools are all modern, the techniques for use are good. Works well with
Salaman's Dictionary. ISBN: 1892214903
Tandy
Leather Factory, Buyer's Guide Catalog
2009. Ft. Worth, TX: Tandy Leather Factory, 2009.
Largest
source for modern leatherworking tools and materials. Catalog shows the items
commonly available to the modern leatherworker.
Theophilus
Presbyter. On Divers Arts. (Ed. and
trans. by J. G. Hawthorne and C. S. Smith). Chicago, Illinois: University of
Chicago Press, 1963.
Twelfth
century treatise on many subjects, including painting and ink making. Good
source for medieval techniques. ISBN: 0486237842
Tuck,
D. H. Oil and Lubricants used on Leather.
Northhampton, England: Leather Conservation Centre, 1983.
Scientific
book on the technical uses of oil on leather. ISBN: 0946072035
Waterer,
John W. Leather Craftsmanship. New
York: Praeger, 1968.
Good
overview of leatherwork from an English perspective. While slightly out of date
compared to the Museum of London series, the pictures are excellent. Waterer
was the 'Father of Leather Conservation.' ISBN: 0713510315
Waterer,
John W. "Leather" in A History
of Technology vol. II. Oxford: Clarendon Press, 1956.
Part
of the 'History of Technology' series, this gives a historical overview of
leatherwork, although it is somewhat outdated by new research and discoveries.
ISBN: 0198581068
Appendix
1:
A Modern Way to Make a Pattern
Modern leatherworkers
have many tools and supplies available to them that were not available to the
Medieval leatherworker. These materials allow greater flexibility and
variation, and while modern, they can help in the creation of historical items.
One alternate modern
method to make accurate flat patterns of 3-dimensional items is to use tape -
duct tape, masking tape, etc. The materials are inexpensive and easy to use,
unlike other molding materials, such as plaster or rubber. The tape, when used
over a covering such as cloth or plastic wrap, can be wrapped around the item,
covering it completely. When the covering is cut off, the tape holds it in
shape, which can be flattened to create the pattern. This method can be used to
create an accurate pattern of a knife or wooden last. Plastic wrap is used to
protect the knife from the sticky residue of the tape.
Wind plastic wrap
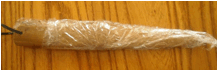
around the knife or wooden last. (Figure 47)
Figure
47:
Plastic wrapped around wooden last. (Author)
Cover
the plastic with masking tape. (Figure
48)
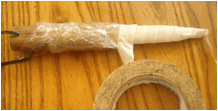
Figure 48:
Covering the plastic with masking tape. (Author)
Draw the seam line
onto the tape (center back, in this case). (Figure
49)
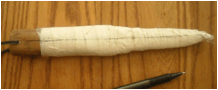
Figure 49:
Drawing the seam line on the tape. (Author)
Cut off the tape and plastic along the seam line. (Figure 50)
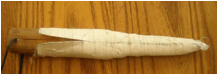
Figure 50:
Cutting the tape pattern off the last. (Author)
Transfer this pattern to
cardstock to make a permanent pattern. (
Figure
51: Cardstock pattern made from the tape
pattern. (Author)
------
Copyright
2012 by Cynthia Sebolt, <czinaangielczyka at gmail.com>. Permission is
granted for republication in SCA-related publications, provided the author is
credited. Addresses change, but a
reasonable attempt should be made to ensure that the author is notified of the
publication and if possible receives a copy.
If this
article is reprinted in a publication, please place a notice in the publication
that you found this article in the Florilegium. I would also appreciate an
email to myself, so that I can track which articles are being reprinted.
Thanks. -Stefan.
<the
end>
 Formatting copyright © Mark S. Harris (THLord Stefan li Rous).